Jump to content


Photo

Tutorial 2: Cliff Terrain


  • Please log in to reply
11 replies to this topic

#1 _Haldir_

_Haldir_

    Mapper

  • Project Team
  • 1,203 posts
  • Location:Australia
  • Projects:The Dwarf Holds, The Elven Alliance: Community Edition
  •  T3A Team Chamber Member

Posted 06 June 2010 - 05:04 AM

Cliff Terrain:
Tips for realistic cliffs and mountains


As I’m sure you know, terrain is one of the most important aspects of any map you make; no less important than texturing or prop placement. Not only does terrain help define the layout of your map, but it is fundamental to creating a realistic looking map.

Something that really bothers me with many maps is the unrealistic look of terrain. This applies equally to “flat” sections of the map, as it does to cliffs and hills. However, cliffs seem to be something that a lot of people struggle with (or simply don’t care about). Here’s what i mean:

Posted Image
This is a map i found on MEVault, which is a perfect example of a shockingly bad attempt at creating realistic cliff terrain.

Ignoring the texturing issues, it’s obvious that the mapper has used the spot height tool, and then smoothed down the edges until he’s left with these “termite mound” excuses for the Misty Mountains.

Seriously? When have you ever seen a mountain that looks like that? I didn’t think so.

Rocky cliffs and mountains, generally speaking, aren’t perfectly smooth. Cliff faces have things like jagged edges, overhangs, and plateaus. Sure if they have softer things like snow or grass on them, they might be smoother, but that doesn’t mean you should have it completely smoothed down.

Compare it to m@tt’s Caradhras map. The texturing is much more realistic, and the terrain has obviously been shaped and smoothed many times, to achieve a realistic look.

Posted Image
Note how irregular and non-symmetrical the cliff is. Cliffs aren't perfectly round, and shouldn't look like 'cones'.

The key is to rework your terrain with a smaller brush size. It might take longer, but gradually work up the cliff area, which will result in smaller, more subtle rises in the cliff face. The amount of feather width, or the amount you smooth the terrain, depends on how jagged a look you are going for.

Sheer cliff walls are just the same. When have you ever seen a perfectly straight cliff? Very rarely do cliffs fall away at a perfect 90* angle. Take a look at these images off Google. Even the cliff below the flat plateau bulges and breaks apart.

Posted Image Posted Image Posted Image

Again, the key to sheer faces is to use a very small brush size and without feather – for all your terrain building tools. Using a small size (maybe a 2) will allow you to create a much more intricate and eroded looking cliff face. Be very limited with your smoothing, and use a combination of raising and digging terrain, to create the look you’re after.

For example, when making my Havens of Umbar map, i needed to create a lot of sheer coastal cliffs that seemed large and imposing – yet still realistic. Using the method i described above, i created a long series of cliffs that were jagged and eroded, whilst still remaining sheer. The easy option (and something that is all too common), would be to simply use the spot height tool and leave it at that.

Posted Image Posted Image
Which seems more natural looking? Sure the left one is a quick mock-up, but cliffs like these are all too common in many (otherwise good quality) maps.

Okay, but what if you need smoother terrain? If you have a grassy ridge, rather than a rocky cliff face, jagged peaks may not be suitable. Have a look at this other MEVault map. The terrain is getting better, and is starting to look more realistic. But do you see that settlement and goblin lair there? If there is a significant enough plateau to build a settlement, than logically it wouldn’t be made of rock.

Posted Image
Which parts are passable? Which aren't?

Texturing and Terrain are equally important. If this small area was textured with a semi-grass, semi-rock texture, than the ridge would appear much more realistic. This also helps the player determine where passable and impassable areas are on your terrain.

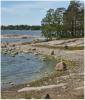
It is always a good idea to look at real locations to find inspiration for your mapping. This not only develops your knowledge and understanding, but also prevents you from falling into repetition (and loss of interest).

Hope that all makes some sense :xcahik_:

Next time, the key features of snow-based maps.


Posted Image Posted Image


#2 _Haldir_

_Haldir_

    Mapper

  • Project Team
  • 1,203 posts
  • Location:Australia
  • Projects:The Dwarf Holds, The Elven Alliance: Community Edition
  •  T3A Team Chamber Member

Posted 06 June 2010 - 05:10 AM

Please comment, and let me know whether you are finding some of these useful :xcahik_: Also, how are people finding the image sizes? I have a wider screen than most, so i've tried to take that into consideration. Let me know if you'd like them bigger/smaller.

Btw, thanks for pinning these :mellow:

Edited by _Haldir_, 07 June 2010 - 10:51 AM.

Posted Image Posted Image


#3 Pasidon

Pasidon

    Splitting Hares

  • Network Admins
  • 9,126 posts
  • Location:Indiana
  • Projects:Writing Words With Letters
  •  I Help
  • Division:Community
  • Job:Community Admin

Posted 06 June 2010 - 05:50 AM

Oh alright... pinning away my troubles...

Exactly... reference your work to actual geological features. Me like.

And I got some neat examples of frozen cliff-sides in Ascension. Hurray for reliance! Keep on em' Hal.

Edited by {IP}Pasidon, 06 June 2010 - 05:54 AM.


#4 Puzzler33

Puzzler33
  • Members
  • 226 posts

Posted 06 June 2010 - 12:07 PM

It's a shame that you can't have overhanging terrain. Like in this picture, you see where the softer rock has eroded away because of the sea (when at high tide – here it's low) and the rock above has bulged out more. It would be great for waterfalls if you could have the rock cut away at the bottom. Also you could make caves :xcahik_:
Posted Image

Edited by Puzzler33, 06 June 2010 - 12:08 PM.

Posted Image

#5 _Haldir_

_Haldir_

    Mapper

  • Project Team
  • 1,203 posts
  • Location:Australia
  • Projects:The Dwarf Holds, The Elven Alliance: Community Edition
  •  T3A Team Chamber Member

Posted 06 June 2010 - 12:12 PM

Mmm it's definitely a shame. You can sometimes use aligninging to terrain and rocks to create smaller overhangs/caves/tunnels etc, but it only really works on a smaller scale.

Posted Image Posted Image


#6 Devon

Devon

    Dark Nerd of the Sith

  • Global Moderators
  • 5,886 posts
  • Location:Colbert Nation
  • Projects:RJ RotWK, Twilight of the Republic, HDLH
  •  T3A Chamber Member
  • Division:Community
  • Job:Global Moderator
  • Donated

Posted 06 June 2010 - 01:55 PM

These are definitely useful Haldir, please keep them coming :xcahik_:

yodasig2.png
My political compass
There's a story that the grass is so green...what did I see? Where have I been?


#7 {IP}Sauron

{IP}Sauron

    title available

  • Hosted
  • 391 posts
  • Location:Denmark
  •  Istari Productions Leader

Posted 07 June 2010 - 09:41 AM

Some Step-by-Step pics would be helpful to young aspiring mappers, but I think that you are very good at explaining and showing of how you yourself have used this method.
"A still more glourious dawn awaits. Not a sunrise, but a galaxy-rise. A morning filled with 400 billion suns." - Carl Sagan
Posted Image

#8 _Haldir_

_Haldir_

    Mapper

  • Project Team
  • 1,203 posts
  • Location:Australia
  • Projects:The Dwarf Holds, The Elven Alliance: Community Edition
  •  T3A Team Chamber Member

Posted 07 June 2010 - 10:50 AM

Thanks guys :p

Hmm perhaps you're right Sauron, i've been trying to steer away from getting too bogged down in step-by-steps, as i've tried to aim more at intermediate mappers. But you may be right, more specifics might be better ^_^

Posted Image Posted Image


#9 Puppeteer

Puppeteer

    title available

  • Global Moderators
  • 2,947 posts
  • Location:United Kingdom
  •  Faute de Mieux
  • Division:Community
  • Job:Magazine Staff/Global Moderator

Posted 07 June 2010 - 11:19 AM

Well, maybe a series of images showing progression of a cliff might be good.
Loving the Havens of Umbar cliffs :p

#10 {IP}jimmyman

{IP}jimmyman

    The only was one can understand me is by being me.

  • Project Team
  • 644 posts
  • Location:Sacramento
  • Projects:Mapping for RJ_RotWK
  •  freelance mapper/3d modeler in training

Posted 07 June 2010 - 02:37 PM

Amazing Hal, that's a wonderful tutorial. I learn something new every day lol.
Sig by Serated
Posted Image Posted Image Posted Image Posted Image Posted Image
Posted Image Posted Image
Posted Image CLICK THE DRAGONS Posted Image Posted Image Posted Image Posted Image

#11 Glaeken

Glaeken

    Almost identical to something very similar

  • Project Team
  • 174 posts
  • Location:Ohio, USA
  • Projects:The Peloponnesian Wars mod - map team
  •  "...wordy little bastard..." - sometimes.

Posted 15 July 2010 - 06:27 AM

This tutorial idea is fantastic; for those just starting out or those that have been doing this for a while.


Sometimes the textures chosen for the cliff or mounded areas can give the map designers a little help with making realistic looking terrain.
We've found that by using the 'mound tool', with appropriate brush and feather size, to add to (or even subtract) where the textures suggests the rock is molded.

Example: (please disregard the default gray areas - texture application in progress)

Posted Image

Hopefully it is evident where 'mounding' occurred and it gives the 'cliffs' a very natural-looking appearance.
Of course not all cliff textures are suitable for this type of terrain manipulation.

Edited by Glaeken, 15 July 2010 - 06:31 AM.


#12 _Haldir_

_Haldir_

    Mapper

  • Project Team
  • 1,203 posts
  • Location:Australia
  • Projects:The Dwarf Holds, The Elven Alliance: Community Edition
  •  T3A Team Chamber Member

Posted 16 July 2010 - 12:23 PM

Thanks ;)

And absolutely, texturing can play a big part in adding something extra to the terrain.

That screen looks really nice by the way :) Have you ever thought about joining a mod or {IP}? If that GL of Gap map you made a while ago is anything to go by, i'm sure you'd be able to. You could post WIP's of your projects here, or add to the tutorials if you wanted.

Posted Image Posted Image


0 user(s) are reading this topic

0 members, 0 guests, 0 anonymous users