

[WIP] Create MA2 files for C3 maps
#1
![[WIP] Create MA2 files for C3 maps: post #1](https://forums.revora.net/public/style_images/revora2013/icon_share.png)
Posted 21 September 2012 - 02:43 AM
It all started here http://forums.revora...ng/page__st__40, (at post #45)
As you may know, all of the Commandos 3 maps were already ported to Commandos 2 some time ago. Since Commandos 3 uses a different file format for storing the masks of the objects (which are responsible for creating "the depth" of the map) and since this format is unknown till this date, all the converted maps are basically simple bitmaps on which the soldiers walk on. The game just can't tell if a unit is in front or behind a building, so everything is drawn on the map, which completely destroys the illusion of a three-dimensional environment (see screenshot).
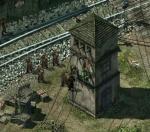
My plan is to change this - and it will be hard work.
If we want to get this done, we will have to cooperate and split the whole project into smaller tasks.
At the moment I'm preparing some files and guides to make the conversion possible, I'll reply soon...
#2
![[WIP] Create MA2 files for C3 maps: post #2](https://forums.revora.net/public/style_images/revora2013/icon_share.png)
Posted 21 September 2012 - 04:33 AM
- to do 3.b. I need the files from 1. to 3.a. you can upload them to the Files section in our team site or in the Google Drive folder (or anywhere else, you choose!)
- the resolution of the screenshots at 3.b. must be 800x600 or can it be different (to take screenshots faster)?
- do you have a technique or a preferred way for doing 3.c. ?
- what exactly is 3.d. and what do you mean when you say "for each object"?
- I need more details for step 4.
- done
- I already ran C3 in a higher resolution, unfortunately the view cone is locked at 800x600 (at least on my PC)
- so far I was using the GIMP to cut, position and merge the screenshots. First I open the map image from the extracted Y64 file. Then I drag&drop the screenshots one by one into the workspace until the whole map is covered with the mask images. That's basically it.
- with object I mean every single tree, wall, box or building on the map. If one mask of such an object is overlapping another mask, we'll have to seperate them manually, like this: http://forums.revora...attach_id=30749
it's obvious that the broken pole is in front of the fence but the game needs seperate masks to handle the depth of the sprites
- and the game needs a simple 3D representation of each object to calculate their order. I'm still not sure how we should make this. It's actually the same technique that was used for the BEL maps, so we could just use the BEL map editor (btw, the map for [TR3] Dark Territory was created with BEL tools). But that's not very efficient because everytime a new object is added in the map editor, it has to be positioned manually.
But here's the thing: if I open the mask of the whole map in GIMP, and then copy&paste the object masks as new layers and save everything in GIMP's own XCF format, then this file contains the object masks as well as their position. And since this format is well documented, it shouldn't be a big problem to create a simple converter.
The 3D representation or bounding volume (or whatever it's really called) must be created for one view only.
#3
![[WIP] Create MA2 files for C3 maps: post #3](https://forums.revora.net/public/style_images/revora2013/icon_share.png)
Posted 23 September 2012 - 06:23 PM
- Install Commandos 3 and Patch it to v1.42 (to start it without disk inserted)
- Follow [Y64] How to make the whole map grey guide to extract the original map images and to grey the ingame maps.
- take notice of map view names in ST1.Y64.files folder to see how you need to rotate your view, use this table for reference in the Progress sheet:
0_0.bmp 1_0.bmp 2_0.bmp 3_0.bmp
the other images found in ST1.Y64.files folder are lower resolution variations of the main images (these four above) so you don't need them.
4a. Copy the SEC,MIS,BAS files from the SEC,MIS,BAS folder to your C:\Program Files\Eidos\Pyro Studios\Commandos 3 - Destination Berlin\Data\Misiones\ST1 folder
4b. Copy also the Parglobal.dat file from Create MA2 for C3 maps to your C:\Program Files\Eidos\Pyro Studios\Commandos 3 - Destination Berlin\Data folder
Step 4a and 4b are part of my proposal to better take screenshots of the whole map, described in step 5.
I have modified all the .mis files so that instead of the Paratrooper you will have a Mechanic, in the Parglobal.dat I have modified the value of his punching speed so that it goes to a minimum where he cannot hit you. This solves two issues: one is that when you were hit by a paratrooper and your Commando was out of the screen, you saw the annoying PiP window popup, now, since he cannot hit you, you will not take damage and the PiP won't pop up. The other issue it solves is having the red line of sight that goes all over the screen between your commando and the enemy, disturbing the image capturing.
5. Launch C3 (you can extract my saves in your main Commandos 3 directory and have all the missions unlocked already), and start your Mission (you will notice that all special effects and enemies have been deleted to make sure you can take better screenshots, all credits go to herbert3000) now start taking screenshots with Clipper (select "capture active window" and not "simulate Print Screen" or you will have to deal with unnecessary one-pixel-wide borders that need to be first eliminated before combining the pictures) into a new folder, it would be a good idea to hide the interface by pressing the key that is right above the TAB key, for my keyboard layout it is \. Now start running with your Commando and make sure that the enemy sees you so he will follow you around the map. Highlight his cone view by clicking on TAB and then on him. Run to a bottom angle of the screen (I go to bottom right first) and turn around so that the enemy can reveal the top part of the map (while trying to unsuccessfully hit you).
6. Now you can start taking screenshots of the map. Once you're done with the top part, you can run to a top angle, so that you will be able to take screenshots of the remaining bottom areas. Try to have clean screenshots and don't capture parts that the enemy's view does not reveal.
7. After you have taken screenshots of all the map, Open your favorite image editor (I use Paint.net) and load the first screenshot into it. I then set the canvas size to the size of the 1_0.bmp image (in this case, to 2518x1381), with Paint.net it is done by pressing CTRL+SHIFT+R. Now you have to combine all the screenshots you take into one big image.
I usually drag&drop the rest of the screenshots into Paint.net and then select Add as new layer. When I need to align them I go into the layer properties of the last added screenshot and set it's transparency to 50. Once I have aligned it, I reset the transparency back to normal (255). Once the image is assembled, I set the Contrast to 100 (CTRL+SHIFT+C in Paint.net) thus making the mask in Black & White, then, as a last step, I invert the colors (CTRL+SHIFT+I in Paint.net) and save the image as .PNG.
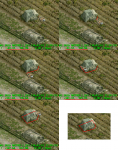
This is the best and fastest way to capture the images in my opinion. I tried using software that auto stitches panoramas like MIcrosoft ICE and Autopano Giga but they kind of blur the pixels around object edges thus ruining the images (see this example: top part is original captured image with Clipper, while the bottom part is after stitching with Microsoft ICE).
8. once you have the complete image, upload it in the masks of whole map folder
P.S. I tried using the C3 Widescreen mod to make screenshots at a higher resoultion but it just messed up the screen.
herbert3000 I have a few questions for you:
- SEC,MIS,BAS files in the TC folder seem to be corrupted, could you reupload them please?
- ST2 folder does not have SEC,MIS,BAS files in it, could you reupload it please?
- there is no DSP folder in SEC,MIS,BAS folder, could you upload the folder with it's files?
- Have you noticed that ST1.MASK.0_0.PNG you uploaded has a size of 2161 x 1616 while the corresponding 0_0.bmp extracted from ST1.Y64 has a size of 2151 x 1616? Is it ok for our purpose of obtaining map masks?
4+5. I basically create a map for BEL with the sprites from C3. Then I use the progams I created for the BEL->C2 mod to convert the BEL{VOL+WAD+SEC} to C2{MA2+SEC} files.
That's how I create the "VOLumenes Escenario":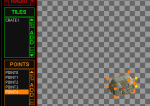
Once we have uploaded the masks, in the masks of whole map folder. What will our next step be? Could you provide some detailed info on steps 4+5? would that fulfill the Create mask of whole map
objective in the
Progress sheet?
#4
![[WIP] Create MA2 files for C3 maps: post #4](https://forums.revora.net/public/style_images/revora2013/icon_share.png)
Posted 23 September 2012 - 06:39 PM
#5
![[WIP] Create MA2 files for C3 maps: post #5](https://forums.revora.net/public/style_images/revora2013/icon_share.png)
Posted 24 September 2012 - 07:37 AM
I totally overlooked that I altered my \Output\COMM3.CFG file. Change the line .MARGENES_UNLOCK from 0 to 1 to unlock the map borders. This should solve the problem with the black lines. But there's really no need to fix your ST1.MASK.1_0.PNG.
I uploaded the ST2, TC and DSP files. There's no updated SEC file in the DSP folder yet because the map has many different height levels. Setting all sectors to the same level doesn't work (this problem also occurs on the 'Infiltrate the station' map).
How is it possible that we have different ST1.Y64 files? My extracted 0_0.bmp is in fact 2161 pixels wide. These are the values from the Description.ini:
[Pic(0,0)]
Width = 2161
Height = 1616
[Pic(1,0)]
Width = 2518
Height = 1370
[Pic(2,0)]
Width = 2167
Height = 1652
[Pic(3,0)]
Width = 2456
Height = 1323
I also attached a PNG which only shows the borders of my extracted image.
Btw, is it possible that you are using a newer version of Clipper? The one on commandoshq.net doesn't have the "capture active window" and "simulate Print Screen" functions.
#6
![[WIP] Create MA2 files for C3 maps: post #6](https://forums.revora.net/public/style_images/revora2013/icon_share.png)
Posted 24 September 2012 - 08:00 AM
So, if I understand it correctly, I can now also work on ST2 and TC, but not DSP yet, correct? Also, I should not take screenshots of TE (Infiltrate the station), is that right?
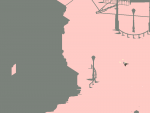
I have taken all the screenshots of BER2, If I will have time today I will assemble the pictures. I had to modify the .bas file removing doors, because there were doors showing, now, where first there was a door, now there is a hole, check this example. I assume it is ok?
#7
![[WIP] Create MA2 files for C3 maps: post #7](https://forums.revora.net/public/style_images/revora2013/icon_share.png)
Posted 24 September 2012 - 08:09 AM
MA2 Overview
First of all, each object on the map has a convex bounding polygon. If it's concave, we will have to split it up into multiple convex polygons. The mask images must be split up accordingly, like this:
The bounding polygon ("Volumen Escenario") of each object is only defined once for all views. The positions of the mask images ("Mascaras") however have to be defined for each of the four views.
In the MA2 file each mask image has a reference to a bounding polygon. For example all four mask images of the same tree in the four views refer to the same bounding volume.
Here's an excerpt fo the Description.xml (from an extracted MA2 file), this the bounding polygon:
<ObjectInfoBlock>
	 <Type>0</Type>
	 <n>4</n>
	 <CenterX>-2279.02</CenterX>
	 <CenterY>-334.57</CenterY>
	 <CenterZ>74</CenterZ>
	 <nx>0</nx>
	 <ny>0</ny>
	 <nz>1</nz>
	 <D>-34</D>
	 <X>
	 <Single>-8.25002</Single>
	 <Single>12.75</Single>
	 <Single>7.74998</Single>
	 <Single>-12.2499</Single>
	 </X>
	 <Y>
	 <Single>-28</Single>
	 <Single>26</Single>
	 <Single>27</Single>
	 <Single>-25</Single>
	 </Y>
</ObjectInfoBlock>
The tags are pretty much self-explanatory, <n> is the number of vertices of the polygon, <D> is the (inverted) height.
That's a mask definition:
<RenderInfoBlockSerializationData>
	 <ObjectIndex>3</ObjectIndex>
	 <x>372</x>
	 <y>1639</y>
	 <RenderMapPath>3_0.A.png</RenderMapPath>
	 </RenderInfoBlockSerializationData>
<ObjectIndex> is the reference to bounding polygon.
The next steps will be:
Slice map mask into object masks
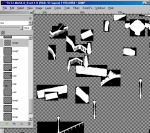
What we have to do now is to split up the mask image of the whole map into the masks of the single objects. If two masks overlap each other, we have to fix the masks manually. As you can see, the mask of the lamp is covered by the masks of the rail and the fence. Based on the colored background image we can draw the missing parts by hand - yeah, that's painstaking but necessary. If there are inaccessible areas on a map (e.g. trees behind a wall), we don't have to create the masks for this area.

I applied a stroke effect on the white part of the map (inner stroke, 1 px, grey). With the "take-screenshot-from-view-cone-method" we only obtain a mask without the half-transparent pixels. By applying the stroke effect, the outer pixels of the masks are defined as semi-transparent.
It's a good idea to use an image manipulating program that supports the use of layers. Just select the mask of an object on the big mask of the whole map and paste it as a new layer. This way the absolute positions of the objects are preserved.
Here you can see the object masks for the TUT2 map:
Create the bounding volumes
At first I'd like to show you a method that doesn't require any external programs. It's possible to obtain all the coordinates for the bounding volumes from the built-in debug info:
I'm afraid we will have to use this method on maps that have an uneven height level. Fortunately most of the maps are "flat" and the default height is 0. For these maps we could use more comfortable methods. I'm thinking about a simple program which shows you the whole map (-> extracted from a Y64 file), the bounding volumes can then be defined by simply clicking on the map. But for the moment this program is only an idea so I'd suggest we concentrate on the other steps first.
#8
![[WIP] Create MA2 files for C3 maps: post #8](https://forums.revora.net/public/style_images/revora2013/icon_share.png)
Posted 24 September 2012 - 08:36 AM
You're welcome!Thanks for the missing files!
So, if I understand it correctly, I can now also work on ST2 and TC, but not DSP yet, correct? Also, I should not take screenshots of TE (Infiltrate the station), is that right?
I have taken all the screenshots of BER2, If I will have time today I will assemble the pictures. I had to modify the .bas file removing doors, because there were doors showing, now, where first there was a door, now there is a hole, check this example. I assume it is ok?
Yeah, you can work on ST2 and TC, they shouldn't cause any troubles.
For the maps TE and DSP I'd suggest to work with the original SEC files. Or maybe it's possible to create the screenshots in stages with different SECs (e.g. one SEC that sets the height to 0 for the lower part of the map, another SEC that sets the height to 50 for the middle part, etc. ... something like this), I'll have to take a closer look a this.
The hole on the map is totally ok. We'll anyway have to manually correct the masks in the next step
#9
![[WIP] Create MA2 files for C3 maps: post #9](https://forums.revora.net/public/style_images/revora2013/icon_share.png)
Posted 24 September 2012 - 12:51 PM
Who has ideas, please share them!
#10
![[WIP] Create MA2 files for C3 maps: post #10](https://forums.revora.net/public/style_images/revora2013/icon_share.png)
Posted 24 September 2012 - 01:57 PM
http://hi.baidu.com/...610f21ac3162706

#11
![[WIP] Create MA2 files for C3 maps: post #11](https://forums.revora.net/public/style_images/revora2013/icon_share.png)
Posted 24 September 2012 - 02:06 PM
#12
![[WIP] Create MA2 files for C3 maps: post #12](https://forums.revora.net/public/style_images/revora2013/icon_share.png)
Posted 24 September 2012 - 02:19 PM
herbert3000 do you think we can accomplish our task with canstay's tool?
#13
![[WIP] Create MA2 files for C3 maps: post #13](https://forums.revora.net/public/style_images/revora2013/icon_share.png)
Posted 24 September 2012 - 04:20 PM
nice!
herbert3000 do you think we can accomplish our task with canstay's tool?
It just a method with Photoshop,no tool for quilt accomplish them.I need some tool for this.
#14
![[WIP] Create MA2 files for C3 maps: post #14](https://forums.revora.net/public/style_images/revora2013/icon_share.png)
Posted 24 September 2012 - 04:25 PM
#15
![[WIP] Create MA2 files for C3 maps: post #15](https://forums.revora.net/public/style_images/revora2013/icon_share.png)
Posted 25 September 2012 - 02:31 AM
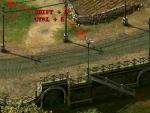
Since this method is kind of exhausting, I created a very simple script for the Cheat Engine which allows us the log the current mouse coordinates. While playing Commandos 2, all we have to do is pressing CTRL+Q and the coordinates are logged.
As you can see on the screenshot, the values in the log and the values in the game are the same:

Follow these steps to use the script:
- Download and install Cheat Engine (http://cheatengine.org/ - I tested the script with v6.1 and v6.2)
Be careful: The setup will ask you to install third-party software as well!
- Extract the attached file and copy main.lua into your Cheat Engine directory (backup original file if you like)
- Start comm2.exe (debug version, 8159288 bytes)
- Start Cheat Engine.exe
- Click the flashing "Select a process to open" button
- Select the process comm2.exe and open it
- Go back to Commandos (if it doesn't respond, hit ALT+ENTER)
- Every time you use the hotkey CTRL+Q, the mouse coordinates are logged.
Pressing CTRL+W will write an emptly line to the log
And don't forget to copy the values from the log window to an empty text file.
Attached Files
#16
![[WIP] Create MA2 files for C3 maps: post #16](https://forums.revora.net/public/style_images/revora2013/icon_share.png)
Posted 25 September 2012 - 01:36 PM
Cheat Engine is very usefull.
thanks.
by the way, can you write a file "main " of get the Y64 values?
#17
![[WIP] Create MA2 files for C3 maps: post #17](https://forums.revora.net/public/style_images/revora2013/icon_share.png)
Posted 26 September 2012 - 12:17 AM
 comm2_script_v2.zip 18.28KB
306 downloads
comm2_script_v2.zip 18.28KB
306 downloadsSHIFT+E will log the current screen position on the background image (the upper left corner of each view is 0,0).
CTRL+E will write the position of the mouse cursor on the background image to the log.
You can easily change the hotkeys, just open the file comm2.lua and edit the VK_ variables.
#19
![[WIP] Create MA2 files for C3 maps: post #19](https://forums.revora.net/public/style_images/revora2013/icon_share.png)
Posted 28 September 2012 - 01:10 PM
#20
![[WIP] Create MA2 files for C3 maps: post #20](https://forums.revora.net/public/style_images/revora2013/icon_share.png)
Posted 02 October 2012 - 12:31 PM
As soon as I have time, I will finish taking screenshots of the remaining maps.
herbert3000, could you prepare the DSP mission as you suggested, to be able to take screenshots of it too?
Now, If I understood correctl, to create the ma2 files, we need to cut out each object, right?
In the spreadsheet called Progress on Google Drive, what still has to be done to be able to put a green completed check under Create mask of whole map ?
2 user(s) are reading this topic
0 members, 2 guests, 0 anonymous users


